Create a Web Services user
Get help if you have questions or experience issues when creating a Web Services user in Sage Intacct
What is a Web Services user?
A Web Services user is a type of user that can only access information in Sage Intacct programmatically, meaning it can't log in, view, and work with Sage Intacct in the same way you can.
A Sender ID must be paired with a Web Services user to enable Codat's connection to your Sage Intacct instance to work. You have previously created the Sender ID when adding a Web Services authorization.
For more information on Web Services users in Sage, see Sage's Web Services users.
How do I set up a Web Services user?
Create a Web Services user
-
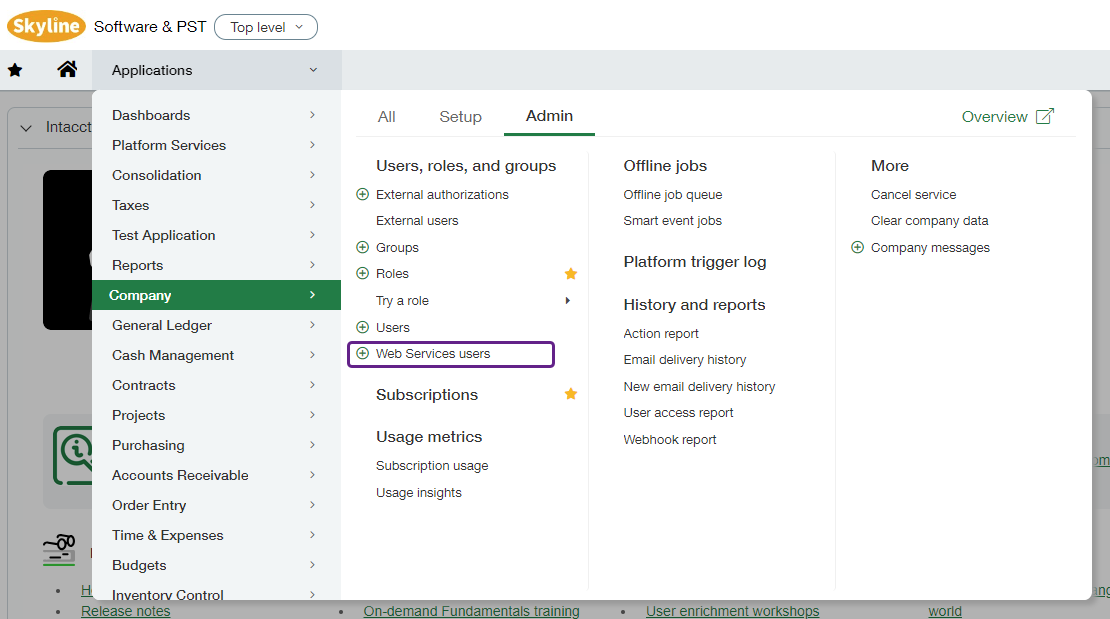
In Sage Intacct's menu dropdown, navigate to Company > Admin > Web Services users, then click Add. This will open the Web Services user information page in Sage.
No additional chargesYou won't incur any charges for creating a Web Services user required by this connection flow.
-
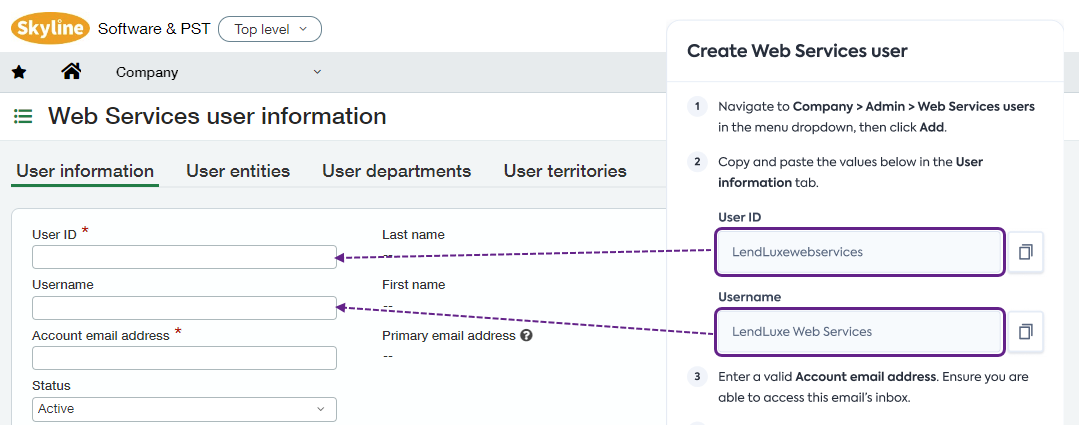
Switch between Codat's connection flow and Sage Intacct to copy and paste the autogenerated values from the flow into the User ID and Username fields on the Web Services user information page.
Enter a valid Account email address. Ensure you are able to access this email’s inbox. Leave Status as Active.
-
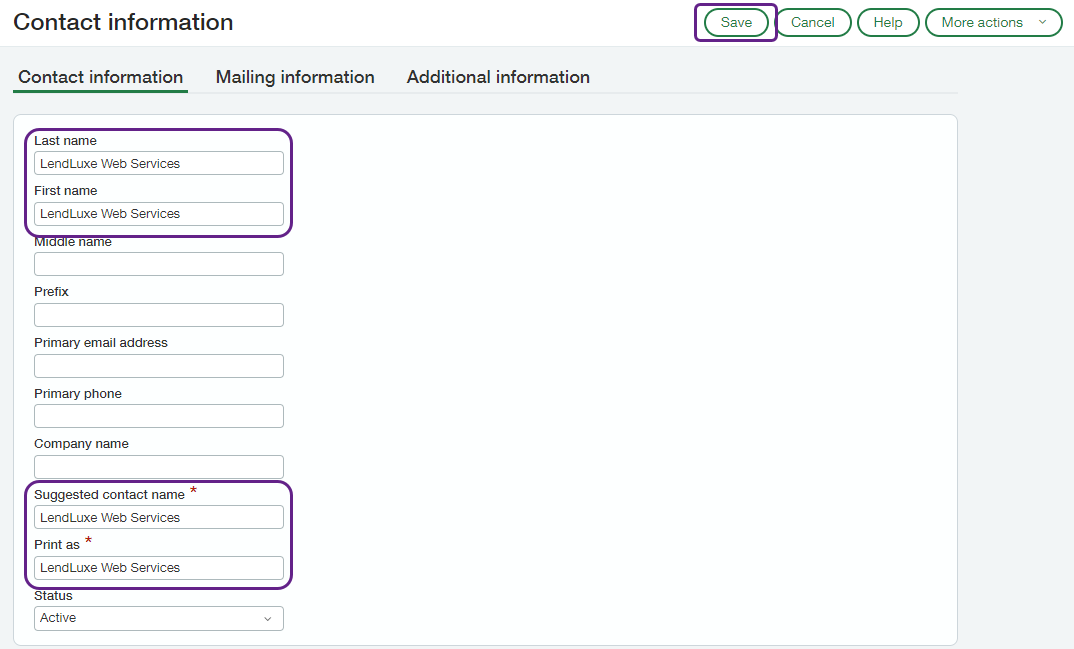
Click on the Contact name dropdown, then click Add. Paste the Username you copied as the First name, Last name, Suggested contact name and Print as values in the pop-up window. Click Save.
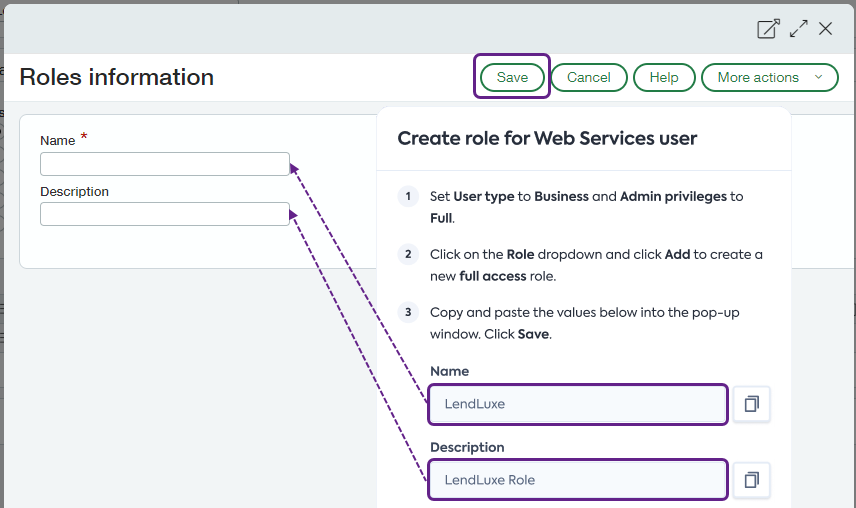
Create a role for the Web Services user
-
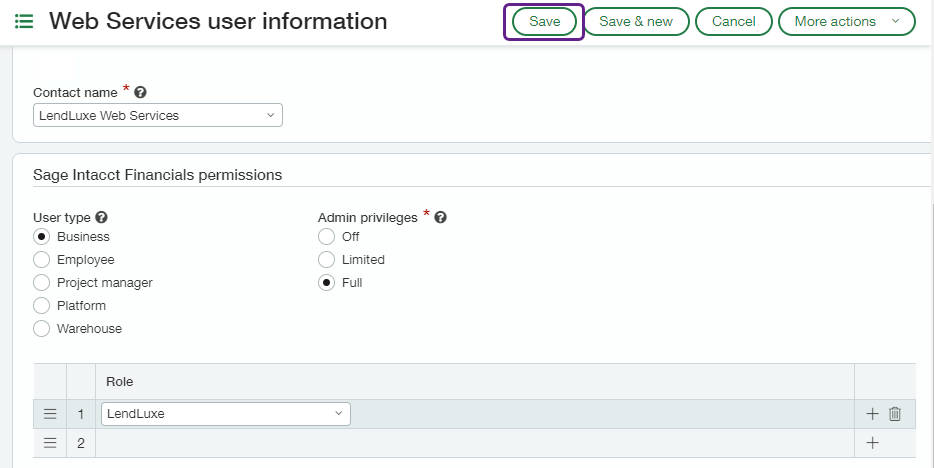
Continue on the Web Services user information page in Sage.
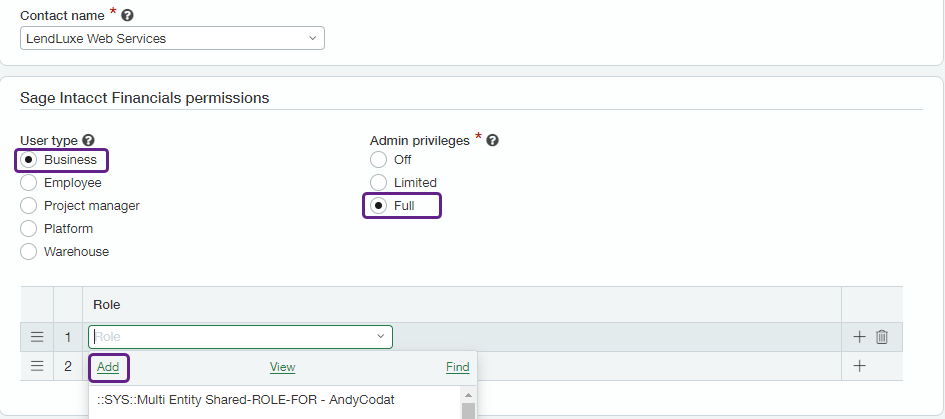
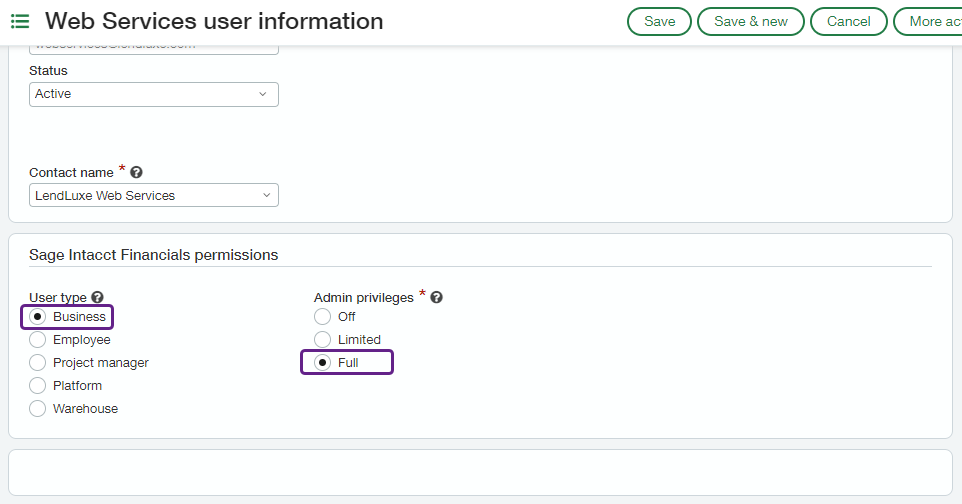
In the Sage Intacct Financials permissions section, select Business as the User type and Full for Admin privileges.
-
Click on the Role dropdown, then Add to create a new full access role.
Already have a full access role?If you're using an existing role with full permissions, select it in the Role dropdown and move to complete the Web Services user setup.
Don't see the Role dropdown?If you don’t see the Role table on the Web Services user information page, it’s likely your Sage Intacct has user-based permissions.
Switch to assigning permissions to the user instead.
-
Switch between Codat's connection flow and Sage Intacct to copy and paste the autogenerated values from the flow into the Name and Description fields in the Roles information pop-up window. Click Save.
Complete Web Services user setup
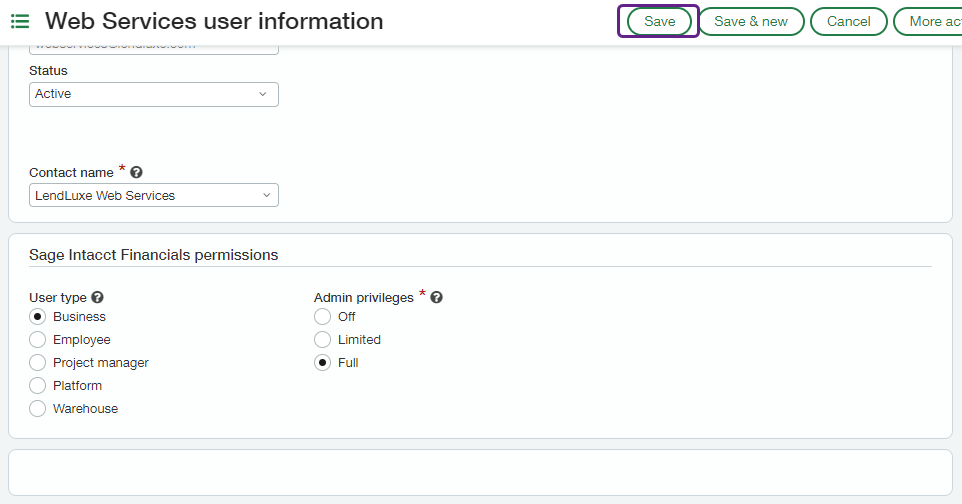
To finalize the creation of the Web Services user, click Save in the user information screen, then click Create in the pop-up and verify the action with your Sage Intacct password.
How do I set role permissions?
If you didn’t see the Role table on the Web Services user information page and didn't create a new role in the process, switch to assigning permissions to the user instead.
Following the steps outlined above, you've created a new role and assigned it to your Web Services user. Next, you need to assign permissions to this role.
Permissions enable the Web Services user to perform a particular function. We recommend assigning full permissions to ensure the connection to your Sage Intacct account works as intended.
For more information on user permissions in Sage, see Sage's About user permissions.
-
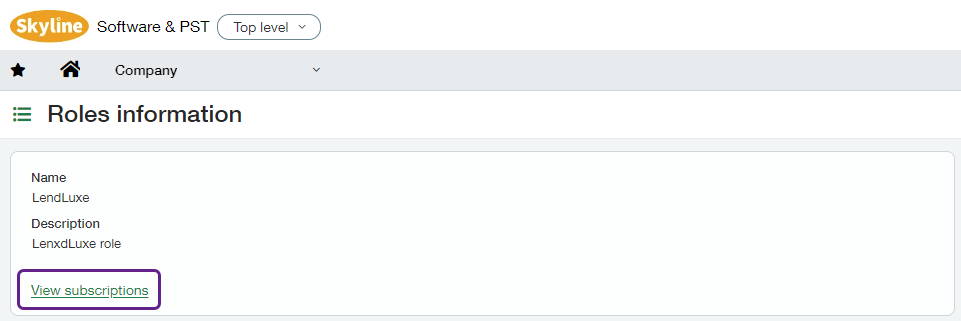
In Sage Intacct's menu dropdown, navigate to Company > Admin > Roles, locate the role you created, and click View.

-
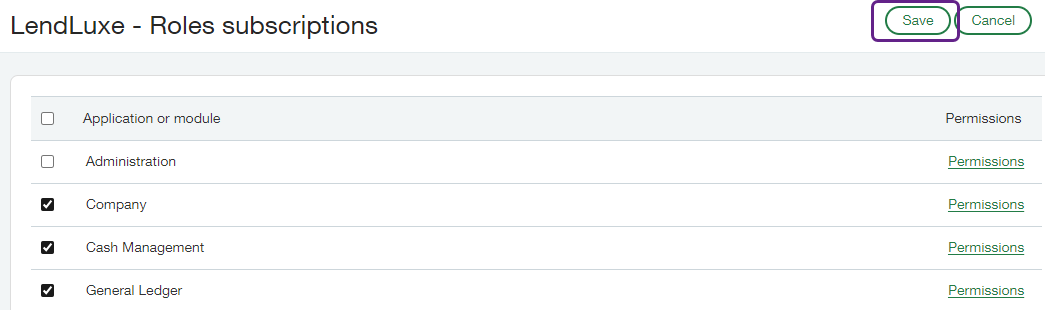
In the Roles information screen, click View subscriptions to open the Roles subscriptions for your role.
-
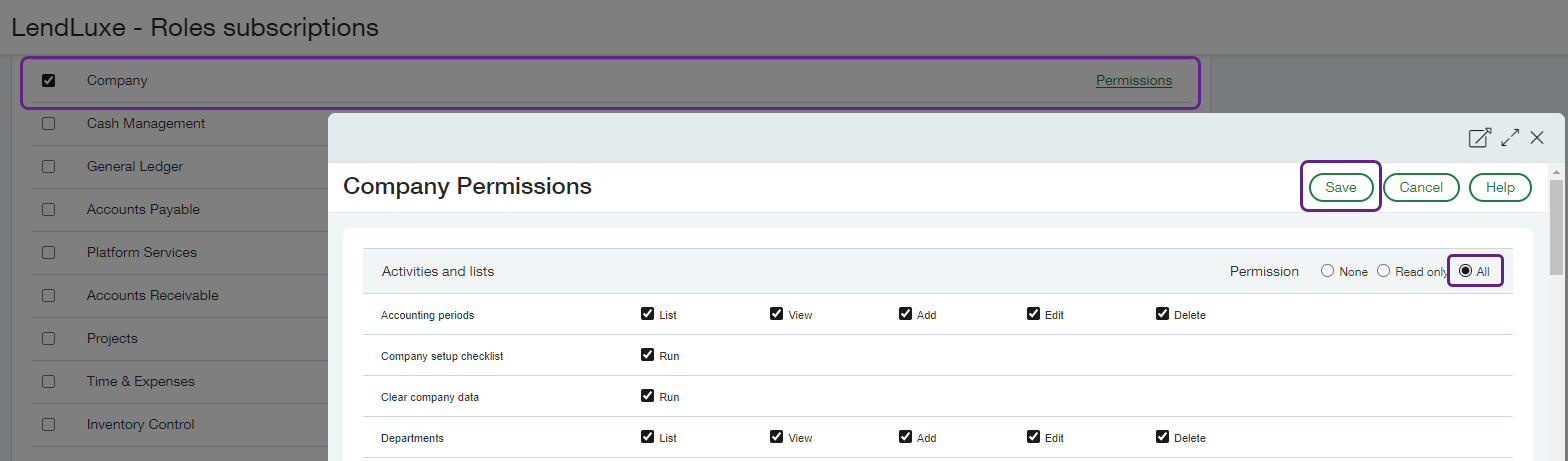
On the Company line, click Permissions. In the pop-up window, select the All radio button on the right, then click Save. Repeat this sequence for each of the following modules and applications:
| Administration | Accounts Payable | Order Entry |
| Company | Accounts Receivable | Purchasing |
| Cash Management | Projects | Contracts |
| General Ledger | Inventory Control | Taxes |
-
When you set permissions for each required module, click Save in the Roles subscriptions screen, then click Done to return to the Roles screen.
Assign granular permissions
If you want more control over the exact permissions of the Web Services user, you can set the granular permissions for each module activity as follows:
- Company
- Cash Management
- General Ledger
- Accounts Payable
- Accounts Receivable
- Taxes
- Order Entry
- Purchasing
- Inventory Control
- Projects
- Contracts
- Administration
| Activity and list | Permission |
|---|---|
| Departments | List and View |
| Locations | List and View |
| Class | List and View |
| Employees | List and View |
| Territory | List and View |
| Document Numbering | List and View |
| Contact Tax Group | List and View |
| Attachment Folders | List and View |
| Attachments | List and View |
| Transaction Allocations | List and View |
| Transaction Currencies | List and View |
| Exchange Rate Types | List and View |
| Exchange Rate | List and View |
| Activity and list | Permission |
|---|---|
| Credit Card Accounts | List, View and Add |
| Savings Accounts | List, View and Add |
| Bank Interest and Charges | List, View and Add |
| Credit Card Transactions | List, View and Add |
| Credit Card Charges and Other Fees | List, View and Add |
| Charge Payoffs | List, View and Add |
| Funds Transfers | List, View and Add |
| Deposits | List, View and Add |
| Other Receipts | List, View and Add |
| Activity and list | Permission |
|---|---|
| Journal Entries | List, View and Add |
| Adjusting Journal Entries | List, View and Add |
| User Defined Journal Entries | List, View and Add |
| GAAP Adjusting Entries | List, View and Add |
| Tax Adjustment Entries | List, View and Add |
| Accounts | List, View and Add |
| Account Title By Entity | List, View and Add |
| Account Groups | List, View and Add |
| Journals | List, View and Add |
| Adj Journals | List, View and Add |
| GAAP Adjustment Journals | List, View and Add |
| Tax Adjustment Journals | List, View and Add |
| Recurring Statistical Journal Entries | List, View and Add |
| Multi-Currency Processing | List, View and Add |
| Financials | List, View and Add |
| Activity and list | Permission |
|---|---|
| Summaries | List, View and Add |
| Manual Payment | List, View and Add |
| AP Advances | List, View, Add and Edit |
| Vendors | List, View and Add |
| Bills | List, View, Add and Edit |
| Adjustments | List, View and Add |
| Recurring Bills | List, View and Add |
| AP Terms | List, View and Add |
| Posted Payments | List, View and Add |
| Posted Advances | List, View and Add |
| Tax Detail | List, View and Add |
| Tax Schedule | List, View and Add |
| Tax Schedule Map | List, View and Add |
| Activity and list | Permission |
|---|---|
| Summaries | List, View and Add |
| Manage Payments | List, View and Add |
| Receive Advances | List, View and Add |
| Customers | List, View and Add |
| Projects | List, View and Add |
| Project Types | List, View and Add |
| Customer Types | List, View and Add |
| Customer Card accounts | List, View and Add |
| Customer Bank Accounts | List, View and Add |
| Invoices | List, View and Add |
| Adjustments | List, View and Add |
| Recurring Invoices | List, View and Add |
| Deposits | List, View and Add |
| Posted Payments | List and View |
| AR Terms | List, View and Add |
| Shipping Methods | List, View and Add |
| Tax Authority | List, View and Add |
| Tax Detail | List, View and Add |
| Tax Schedule | List, View and Add |
| Tax Schedule Map | List, View and Add |
| Activity and list | Permission |
|---|---|
| Tax Records | List and View |
| Activity and list | Permission |
|---|---|
| Customers | List, View and Add |
| Items | List, View and Add |
| Unit Of Measure | List, View and Add |
| Product Line | List, View and Add |
| Price Lists | List, View and Add |
| Price List Entry | List, View and Add |
| Tax Authority | List, View and Add |
| Tax Detail | List, View and Add |
| Tax Schedule | List, View and Add |
| Tax Schedule Map | List, View and Add |
| Contacts | List and View |
| Recurring Transactions | List, View and Add |
| Order Entry Transactions | List, View and Add |
| Payments | Add |
| Payment Account Information | List and Edit |
| Payment Exchange Rate Information | List and Edit |
| Activity and list | Permission |
|---|---|
| Vendors | List, View and Add |
| Items | List, View and Add |
| Unit Of Measure | List, View and Add |
| Product Line | List, View and Add |
| Price Lists | List, View and Add |
| Price List Entry | List, View and Add |
| Tax Detail | List, View and Add |
| Tax Schedule | List, View and Add |
| Tax Schedule Map | List, View and Add |
| Contacts | List and View |
| Activity and list | Permission |
|---|---|
| Vendors | List, View and Add |
| Product Lines | List, View and Add |
| Items | List, View and Add |
| Item Tax Groups | List, View and Add |
| Units Of Measure | List, View and Add |
| Price Lists | List, View and Add |
| Price List Entry | List, View and Add |
| Activity and list | Permission |
|---|---|
| Customers | List, View and Add |
| Projects | List, View and Add |
| Tasks | List, View and Add |
| Items | List, View and Add |
| Employees | List, View and Add |
| Invoices | List, View and Add |
| Activity and list | Permission |
|---|---|
| Contract | List, View and Add |
| Activity and list | Permission |
|---|---|
| Company Info | View |
How do I set user permissions?
If you don’t see the Role table in the Sage Intacct Financials permissions section when creating a new Web Services user, it’s likely because your Sage Intacct instance is configured with user-based permissions.
To finish setting up your Web Services user and the relevant permissions, follow these steps:
-
Continue on the Web Services user information page in Sage.
In the Sage Intacct Financials permissions section, select Business as the User type and Full for Admin privileges.
-
Click Save in the Web Services user information screen, then click Create in the pop-up and verify the action with your Sage Intacct password.
-
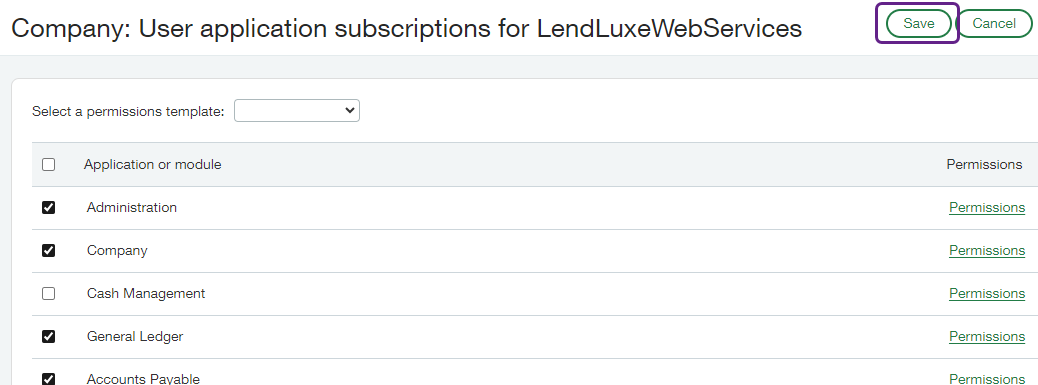
The User application subscriptions window will appear for the Web Services user you created.
For each of the following modules and applications, click Permissions. Select the All radio button on the right of the pop-up window, then click Save.
| Administration | Accounts Payable | Order Entry |
| Company | Accounts Receivable | Purchasing |
| Cash Management | Projects | Contracts |
| General Ledger | Inventory Control | Taxes |

-
When you set permissions for each required module, click Save in the User application subscriptions screen, then click Done to return to the Web Services users screen.
Assign granular permissions
If you want more control over the exact permissions of the Web Services user, you can set the granular permissions for each module activity as follows:
- Company
- Cash Management
- General Ledger
- Accounts Payable
- Accounts Receivable
- Taxes
- Order Entry
- Purchasing
- Inventory Control
- Projects
- Contracts
- Administration
| Activity and list | Permission |
|---|---|
| Departments | List and View |
| Locations | List and View |
| Class | List and View |
| Employees | List and View |
| Territory | List and View |
| Document Numbering | List and View |
| Contact Tax Group | List and View |
| Attachment Folders | List and View |
| Attachments | List and View |
| Transaction Allocations | List and View |
| Transaction Currencies | List and View |
| Exchange Rate Types | List and View |
| Exchange Rate | List and View |
| Activity and list | Permission |
|---|---|
| Credit Card Accounts | List, View and Add |
| Savings Accounts | List, View and Add |
| Bank Interest and Charges | List, View and Add |
| Credit Card Transactions | List, View and Add |
| Credit Card Charges and Other Fees | List, View and Add |
| Charge Payoffs | List, View and Add |
| Funds Transfers | List, View and Add |
| Deposits | List, View and Add |
| Other Receipts | List, View and Add |
| Activity and list | Permission |
|---|---|
| Journal Entries | List, View and Add |
| Adjusting Journal Entries | List, View and Add |
| User Defined Journal Entries | List, View and Add |
| GAAP Adjusting Entries | List, View and Add |
| Tax Adjustment Entries | List, View and Add |
| Accounts | List, View and Add |
| Account Title By Entity | List, View and Add |
| Account Groups | List, View and Add |
| Journals | List, View and Add |
| Adj Journals | List, View and Add |
| GAAP Adjustment Journals | List, View and Add |
| Tax Adjustment Journals | List, View and Add |
| Recurring Statistical Journal Entries | List, View and Add |
| Multi-Currency Processing | List, View and Add |
| Financials | List, View and Add |
| Activity and list | Permission |
|---|---|
| Summaries | List, View and Add |
| Manual Payment | List, View and Add |
| AP Advances | List, View, Add and Edit |
| Vendors | List, View and Add |
| Bills | List, View, Add and Edit |
| Adjustments | List, View and Add |
| Recurring Bills | List, View and Add |
| AP Terms | List, View and Add |
| Posted Payments | List, View and Add |
| Posted Advances | List, View and Add |
| Tax Detail | List, View and Add |
| Tax Schedule | List, View and Add |
| Tax Schedule Map | List, View and Add |
| Activity and list | Permission |
|---|---|
| Summaries | List, View and Add |
| Manage Payments | List, View and Add |
| Receive Advances | List, View and Add |
| Customers | List, View and Add |
| Projects | List, View and Add |
| Project Types | List, View and Add |
| Customer Types | List, View and Add |
| Customer Card accounts | List, View and Add |
| Customer Bank Accounts | List, View and Add |
| Invoices | List, View and Add |
| Adjustments | List, View and Add |
| Recurring Invoices | List, View and Add |
| Deposits | List, View and Add |
| Posted Payments | List and View |
| AR Terms | List, View and Add |
| Shipping Methods | List, View and Add |
| Tax Authority | List, View and Add |
| Tax Detail | List, View and Add |
| Tax Schedule | List, View and Add |
| Tax Schedule Map | List, View and Add |
| Activity and list | Permission |
|---|---|
| Tax Records | List and View |
| Activity and list | Permission |
|---|---|
| Customers | List, View and Add |
| Items | List, View and Add |
| Unit Of Measure | List, View and Add |
| Product Line | List, View and Add |
| Price Lists | List, View and Add |
| Price List Entry | List, View and Add |
| Tax Authority | List, View and Add |
| Tax Detail | List, View and Add |
| Tax Schedule | List, View and Add |
| Tax Schedule Map | List, View and Add |
| Contacts | List and View |
| Recurring Transactions | List, View and Add |
| Order Entry Transactions | List, View and Add |
| Payments | Add |
| Payment Account Information | List and Edit |
| Payment Exchange Rate Information | List and Edit |
| Activity and list | Permission |
|---|---|
| Vendors | List, View and Add |
| Items | List, View and Add |
| Unit Of Measure | List, View and Add |
| Product Line | List, View and Add |
| Price Lists | List, View and Add |
| Price List Entry | List, View and Add |
| Tax Detail | List, View and Add |
| Tax Schedule | List, View and Add |
| Tax Schedule Map | List, View and Add |
| Contacts | List and View |
| Activity and list | Permission |
|---|---|
| Vendors | List, View and Add |
| Product Lines | List, View and Add |
| Items | List, View and Add |
| Item Tax Groups | List, View and Add |
| Units Of Measure | List, View and Add |
| Price Lists | List, View and Add |
| Price List Entry | List, View and Add |
| Activity and list | Permission |
|---|---|
| Customers | List, View and Add |
| Projects | List, View and Add |
| Tasks | List, View and Add |
| Items | List, View and Add |
| Employees | List, View and Add |
| Invoices | List, View and Add |
| Activity and list | Permission |
|---|---|
| Contract | List, View and Add |
| Activity and list | Permission |
|---|---|
| Company Info | View |
How do I check my role's permissions?
If you are using an existing role to assign it to your new Web Services user, you may want to check it has the full set of required permissions:
-
In Sage Intacct's menu dropdown, navigate to Company > Admin > Roles, locate the role you plan to assign, and click View.
-
In the Roles information screen, click View subscriptions to open the Roles subscriptions for your role.
For full access permissions, ensure that all permissions are selected for each of the following modules and applications.
| Administration | Accounts Payable | Order Entry |
| Company | Accounts Receivable | Purchasing |
| Cash Management | Projects | Contracts |
| General Ledger | Inventory Control | Taxes |
If you want to check the permissions at a granular level, review the How do I assign permissions to the role? section.